|
Remote Keyboard Help
|
Here you can find a guide to help you set up Remote Keyboard Server and connect your device. Following the guide are trouble shooting tips.
If you are looking for the Remote Keyboard product page click here
|
| Server Installation |
1. Download server installer from here
2. Open then installer and follow the prompts. The default settings are appropriate for most installations.
3. After installation is complete you have the option to run the server now. Ensure the check box is checked and click Finish. The server should now run.
NOTE: The installation sets the server to run when windows starts.
|
| Using the Server |
Server icon and Device List window
When the server is running you should see the Remote Keyboard Server Icon  in your notification area near your task bar clock. in your notification area near your task bar clock.
By double clicking on this icon gives the the device list window will appear.
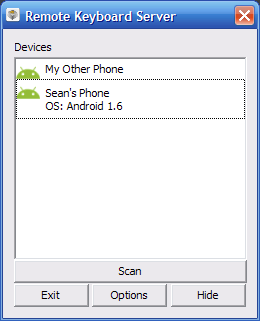
The device list window shows you the currently connected devices.
Connection Approval Prompt
When a device connects you will be prompted for the device's connection approval. This allows you to only allow devices to connect that you want to use. Open the Device List window and double click on the device that requires connection approval. You will be displayed with the approval prompt.

Click Approve to allow the device to complete the connection. Clicking Deny will disconnect the device.
Input
Once your device has connected, when it requires input you will be notified and the device input window will display.
 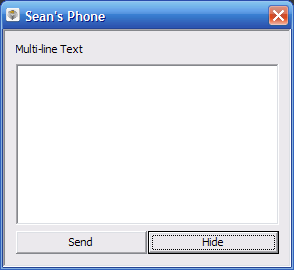
The device input window will look different depending on the type of input that is required. These images show single line input and a multi-line input prompts. You can select the appropriate text field and start typing text, it will appear on your device.
Action button
The button next to hide in the Device input window is the "action button" and will change title depending on the action it will perform. For example the above images show Next and Send, they were images taken during entering text in a "To" text field and entering text in a message text field respectively. If the input action is not known the action button will be disabled and have the title "Unknown".
Useful tip: Pressing the Enter key in a single line input window is the same as clicking the action button. Also pressing CTRL+Enter in a multi line input window is the same as pressing the action button.
Scan button
The scan button in the Device List window makes the server scan the network for devices that may be running the Remote Keyboard. If the device is configured appropriately it will connect automatically.
The default configuration of the device and server make connecting easy. The device will automatically announce itself to servers when input is required, and when a server responds (the same as clicking scan) the device will connect. In most cases you should not need to use the Scan button.
|
| Server Options |
The Remote Keyboard Server can be completely configured for connection settings as well as behaviour when devices connect or require input.
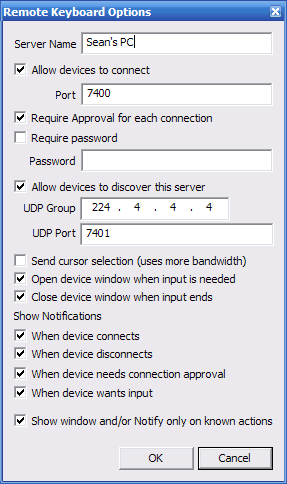
Connection settings
Server Name
The name of the Server. This is the name the device knows the server as.
Allow devices to connect
Unchecking this box stops devices from connecting all together.
Port
Advanced setting for advanced users. Leave set to the default setting (7400) if you do not know what this field is for.
Require Approval for each connection
When checked the device approval prompt is displayed when a device connects. The device must be approved before text can be entered.
Require password
If checked the device must connect using the password in the Password field. If a password is required the device needs to be properly configured to connect. This requires entering in server information in the options on the device. It is recommended to just require approval for each connection rather than using a password as the default settings on for the device can be used.
Allow devices to discover this server
When checked the server will respond to devices announcing their presence. If unchecked the Scan button in the Device List Window does not function.
UDP Group and UDP Port
Advanced Options for advanced users. Leave the default settings, 224.4.4.4 and 7401 respectively, if you do not know what these settings are for.
Behaviour Settings
Send Cursor selection
When checked the cursor on the connected device will move when the cursor on the server moves. It is recommended to keep this feature off to reduce the bandwidth required.
Open device window when input is needed
The input window of the PC for the device will appear automatically when device input is required. This behaviour, for some users, may interrupt your work. Uncheck this box to turn it off.
Close device window when input ends
With this option turned on the input window will hide automatically when input is no longer needed by the device.
Notification Settings
When Device Connects
When checked a notification balloon will display when a device connects
When Device disconnects
When checked a notification balloon will display when a device disconnects
When Device needs connection approval
When checked a notification balloon will display when a device needs connection approval
When device wants input
When checked a notification balloon will display when a device requires input
Show window and/or Notify only on known actions
When checked the behaviour and notification settings take affect to only known actions. It is recommended to keep this option set otherwise you may be interrupted excessively, depending on the device that has connected.
|
| Remote Keyboard on your Device |
Once you have found Remote Keyboard on the Android Market, downloaded and installed it. Follow these steps to turn it on.
1. Open your Device settings
2. Scroll down to Locale & text and press it.
3. Remote Keyboard should be displayed under Text settings (you may need to scroll down if you have other input methods installed). Press the Remote Keyboard option to turn it on.
NOTE: The Remote Keyboard Settings can also be accessed from this screen.
4. A message will pop up explaining the risks of using alternative input methods. Press Ok.
At this point Remote Keyboard has been enabled and can be used. To switch to Remote Keyboard Input method.
1. Make sure you are connected to your wireless network and that the Remote Keyboard Server is running on your PC.
2. Open an activity that requires text input. Messaging is a good place to test Remote Keyboard out.
3. Select a text field to enter text into. The connection status display should appear instead of the Android keyboard (or other input method you were using)
4. If no settings were changed from the defaults (on the server or device) the device should automatically connect. You should get a notification on your PC indicating that the device needs connection approval.
5. Follow the "Using the Server" instructions above.
|
| Device Settings |
NOTE: These settings apply for Android� devices.
The default settings on the device are designed to make connecting as simple as possible. The device should automatically discover the server and connect.

| Instead of an on screen keyboard or keypad Remote Keyboard will show a connection status display.
From the display you can connect to or disconnect from a server. You also have quick access to Options and a button to quickly switch to an alternative input method.
|
 | Options explained
Send Link to Email
Clicking on this button allows you to send a link to the Emblem Website to download the Remote Keyboard Server. This is for your convenience.
Device Name
You can specify the name of your device as it will be seen in the Server's device list. NOTE: If already connected to a server, changing the device name may not cause an immediate change on the server.
Servers
You can define your own servers to connect to here. If you would rather not use the Auto connect functionality, you can manually enter your server settings. If your server requires a password you will need to enter the connection settings and password here.
Add Server
Brings up a prompt to enter the server address and password.
Clear server List
Clears the saved list of servers. NOTE: There is no confirmation when pressing this.
Auto Connect Discovered
When a server sends out an announce (pressing the scan button in the Server Device list window or a response from a device announce) if this option is checked the Device will automatically connect to the discovered server. If unchecked the Connection status screen will display "Found Server Name", where Server Name is the server's name. If you wish to connect to this server you can press the Connect button. NOTE: If you have configured a server manually and have it selected in the server list then pressing connect will connect to the specified server and not the discovered one.
Fall back Input Method
When you can not easily access your keyboard or if you are disconnected from a server you can quickly switch to another Input Method from the connection status display on the device. The Input Method this button switches to is determined by this setting. Pressing this will show you available Input Methods you can switch between.
Announce settings
Announce Presence
When checked will cause your device to announce it's presence on the network for servers to discover. If this is unchecked you will need to either manually add a server to connect to or press the Scan button on your server's Device List window.
Periodically
When checked the device will periodically announce it's presence on the network. NOTE: This setting is rarely required as the device will announce it's presence (when the Announce Presence option is enabled) every time the device needs input. You can leave this setting turned off.
Wake options
When the phone is locked and the screen is off and input is entered from the server the device can be woken up and unlocked.
Unlock on input
When input is entered the device will unlock if this option is enabled.
Wake on Input
When input is entered the screen will turn on if this option is enabled.
NOTE: Most input fields require the phone to be unlocked to enter text. It is recommended you keep these settings turned on.
Advanced Settings
These settings are for advanced use. Options for changing ports, time out time, announce period and UDP address can be found here.
|
|
| Trouble shooting tips |
The default options are designed to make connecting simple. It is recommended that you keep the default settings.
Device will not connect to the server
1. Make sure the server is running on your PC.
2. Check in the server options that the server has "Allow devices to connect" checked.
3. Ensure your device is connected to the same network that your PC is connected to.
4. Check that the device settings "Automatically connect to Discovered" and "Announce Presence" are turned on.
If you still can not connect
Ensure the following settings
The Server port option is 7400
The Server UDP group is 224.4.4.4
The Server UDP port is 7401
The device Port (in advanced settings) is 7400
The device Announce Address (in advanced settings) is 224.4.4.4
The device Announce Port (in advanced settings) is 7401
If you still can not connect you may have configured a server to connect to that is not available.
1. Open the device options
2. Under Servers, press the Server button (Press here to select your server) and select the blank option from the list.
Go back and try connecting again
Fall back input method button does not work
If you get a message that says "One moment please..." after pressing switch input method button and nothing happens, select a different input field (if one is available) or scroll your track ball up then down again. This is a problem with Android not switching the input display. The selected input method is changed when this is pressed but just may not change until input is required elsewhere.
When entering text in a single line text field that has suggestions, not all suggestions appear
This is a technical issue that we will continue to investigate. The Input Method is only told of a certain type of suggestion when it appears. Specifically the search suggestions do not display all options. The only work around for this is to select the option on your device when it appears.
When I click the action button (or keyboard shortcut to) the action is not performed
The action that may be performed is dependent on the current input field. Some activities do not respond to the identified action, this is out of our control and the only way around this is to complete the action on your device.
The device Input Window frequently shows up on the PC with an unknown action, when I check the device no input is needed.
Input may be entered at times you may not expect. For example from your home screen if you were to start entering text the search prompt would display, and the action would then be displayed. If you enter text in your contacts list it will perform a search for contacts matching your entered text.
These text entering options do not have a "known" action. But are still valid areas for input. The default settings should not cause this behaviour. Check that the "Show window and/or Notify only on known actions" option in the server's option is enabled. |
|
|